Showing posts with label track. Show all posts

Sunday, September 30, 2018

Danger Signs We Found On Our Vintage Road Race Thunderbird


We brought this car into our shop, as kind of a side job, work on it when there is time, sort of project.  It is a former Howe/Port City ASA chassis, which like so many others, has been converted to road race configuration.  These cars are known for being well built, and safe, given the speeds and facilities that they ran on.  It had last been run at two of the very best know race tracks in the U.S.  The sanctioning body for the events is very well established, in vintage racing.  The car had also been raced with a well know national road race group, in non-vintage, "GT" type car configuration.  And that's where the story starts to get scary.  Real scary.

There were a few safety related concerns, which we are working to correct, as time allows.  For starters, the car is equipped with an electrical fuel pump, as are so many road race cars.  The master kill switch was located in the rearward, passenger side corner of the car.  It was no where within reach of the the previous driver, or any driver, unless he has five foot long arms.  If you have ever been in a real bad wreck, you know seconds can seem like minutes, while you try to figure out just what to do next.  Corner workers do not always arrive, in a hurry.

Think about what could happen, if there was a broken fuel line, sparks, and that electric fuel pump is continuing to do it's job.  As a driver, you might be disoriented, and not able to kill the power to the pump, in the few seconds necessary.  All the switches can look the same, and you could even hit the wrong one.  By placing the master switch in direct reach of the driver, there is only one movement necessary, with one arm, in the vital moments, after a big one.  Why not mount the master kill switch, in very close proximity, to the fire bottle switch?  We relocated the previously installed kill switch, which was actually a really easy job.

You can see the new switch location, in the photo below.  Note the LED "power on" indicator light. We included an easy to read, Allstar Performance, "On/Off" decal ( ALL99045).  Also added were some Allstar Performance red terminal covers (ALL76152).  The "shelf" was bent up from sheet steel, and welded in place.  The Sherwin Williams grey spray paint, matches perfect, and looks great.  Anyone can know at a glance, if the car is hot, or hot so not.  Notice those nice welds, from Howe Racing Enterprises.  These cars have good bones.  Maybe it will take a very bad vintage crash, for the vintage organizers to wake up, put down the tea, and  hot buttered croissants, and get serious about car inspections.  There are some pretty quick cars that run vintage, and not all the drivers have had a lot of experience racing.  With enough $$, you can buy yourself something that was a handful, for even Mark, or Parnelli, back in the day.  We are not sure what more to say about this, but of course, there is more.


The next subject is bolt on ballast, which in this case, gave us nightmares.  Same car, same tech inspection crews, same organization, big name tracks, and the potential for horrible results, in a roll over shunt.  Loose ballast flying through your windshield can be a very serious problem, trust on this.  Notice the size of the weight.  Over 100 lbs., for sure. The number "48" is from the cars ASA racing days, so it's hard to say when the install work was done.  Two half inch bolts, were all that was holding this massive chunk of weight, to the car.  The holes are easy to see, in the two photos.  The weight was actually bolted to an 1/8" strip of steel, that runs down the frame rail, put there to hold the fiberglass body door panel, in place.  You can literally lean on it with your big tow, and get it to flex.


We have had some surprising experiences, on the track, and off track, with race organizers, as well.  Once our cars clutch caught on fire, as we sat helpless, waving our arms, at the (regional race) corner workers.  Smoke was literally pouring out from under the front wheel wells, and no one even came over to check it out, despite frantic window waving.

Another time, we watched in amusement, as our car received it's annual tech inspection, very much outside, on a Friday night, and in the dark.  Flashlight, and all.  Seems crazy.  Safety starts with the driver, and car owner.  Don't count on others, even though you should be able to.  Bad things  can happen fast on a race track, don't make things worse.


Thursday, September 20, 2018

OMP Took Hook Is The Best Bang For The Buck

There is nobody, and we mean NOBODY, who has been yanked back to the pits more times than us.  Nobody.  (Except Danica).  We have found that the OMP tow hook out performs them all.  Simply, bright color, low profile, cost effective.  Required by SCCA, NASA, IMSA, and all the rest.  The choice of European professionals.  Great for track day cars, as well.  Test one for your self, and see the difference a quality tow hook can make.


Visit our race shop, on the web, at:

Sunday, August 26, 2018

The Most Cost Effective Choice For Replacement LS-1 Ignition Coils


The choices for replacement ignition coils on the LS-1 motor get expensive real fast.  You have to wonder if the extra  money for the brand names are really worth it.  We did a fair amount of research, and settled on PerTronix, for the next set on our GT-2  race car.  We are very familiar with the brand, and the specs looked good.  This is pretty much a replacement for the GM truck coils, that went on the performance LS-1 motors, in the late 1990's.  The headers on our motor run up past the valve covers, and put a lot of heat out, right by the coils.  Plus they sit right on the valve covers anyway, which is a pretty hot area, as well.


http://www.gearheadzproducts.com


Saturday, August 25, 2018

Quatermaster Clutch Kit For ASA LS-1 Motor

If you are looking to replace the clutch assembly on your LS-1 ASA motor, it can get a little confusing as to which kit to order. You will find this is typically a non-stock, special order item, which cannot be returned. The Quartermaster part number you need to know is:  QTR39817790.  This is the assembly which will bolt up directly to the LS-1 Crankshaft.  These motors were originally shipped by Chevrolet, down to Lingenfelter, in IN, for final prep, work, before installation in AC Delco ASA Race Series cars.


Thursday, June 30, 2016

ASA LS1 Race Car Won't Start Is Not Always The ECU


We recently drove up to the grid and parked, to go out for the first race of the new SCCA year.  At two minutes, they blew the whistle, and the same car that we just drove up to our spot, would not start.  No way, no how.  The tendency is to blame the ECU right away, especially with these cars.  But the folks up a Schwanke say they rarely if ever see one go bad.  At lease not with out a good reason (attaching a welder ground for instance)  It's real simple, you have to have spark, compression, and gas.  In our case, the fuel pump was not priming the system, and there was no go juice, up at the inspection port we installed, on the engine fuel rail.  After tracing the  dual fuel pump circuit back, we found a slightly unexpected burnt (to a chrisp) four prong wire connector, which kind of ruined the day, and the weekend.  Allstar makes a replacement OEM style four prong unit, PN # ALL76269, rated at 20 amps.  Our very small packet arrived in a very large box, with a couple of air bags, to reduce the chance of damage (?). 


At any rate, we were glad to pay the $13.50 in shipping for this $3.75 shipment, to get after fixing the problem.  Make sure you order extra individual male and female connectors, because there is a reason they sell them seperately.  We ended up building a whole new harness, on the switch side of the system.  There was very little extra wire to work with anyway, so we made sure it will be easier to deal with, in the future.  The LS-1 burped to life at the frst spin of the Tilton, and we are back in business.  See the seperate blog, about the time the pump connection vibrated loose.  These cars are fun, cheap, but somedays, an electrical challenge.


http://www.gearheadzproducts.com

Sunday, December 20, 2015

A Thunderbird Road Race GTA Car Joins Our Blog

Like many of you, we are always scouting E Bay, and Racing Junk, looking for that next exciting project.  Our gang has become big fans of former ASA cars, because there are a number of them floating around, they sure don't cost much, and make great road racers.   We have had a Baker Motor setting in our shop for a while, from the days of sportsman short track fender banging, and looking for a chassis to drop it into.  A couple months ago, a Johnny Benson car came up locally, for $4,000, but it had been sitting in "as raced" condition for many years.  Overall in good condition, but not yet converted over to left hand/right hand operation.  Then we discovered this Former Joe Nott V6 ASA race car, just a little bit further from home.  It had the switch done by Howe, but was in need of some work, due to a "smack job" with one of the guard rails, over at Road America.  Besides our Camaro  GT-2 car, we will start documenting the modifications, and upgrades, to this race machine.  Stay "tuned", for further developments.


Monday, October 5, 2015

Race Car Or Track Day Car Storage In Grandville, MI


We have limited spaces available, for storage of your special interest, track day car, or race car.  Move in on November 1st.  Month to month.  Close to downtown Grandville, MI area, and local freeways.  Very clean, dry, and secure building.  Call:  616-366-3973, for further information.


Visit us on the web at:  http://www.gearheadzproducts.com
 

Sunday, June 7, 2015

Maximize Your Race Cars Ignition System

We have been around race cars, and performance street cars for many, many years.  One of the biggest soures for increased performance, and problems, is the cars ignition components.  Keeping the system fully functional is simply a matter many times of staying ahead of problems that are going to occur.  Ignition wires are good for only a few years, at best, considering the conditions that they operate in.  Headers are extremely hot, and burnt wires are not uncommon, which usually means a buying a whole new set of wires, and worse yet, pulling off the race track early.   We devleoped these simple but effective plug wire covers, to go on the wire at the spark plug end.  They really work, and are less than a new set of wires.


We saw a race car that would not run about ten years ago, on the most humid night of July.  The next night we popped the hood, and started it up.  You could see electric arcs coming off the plug wires, in the dark.  The wires were made by a well known company, and did not have that many laps on them.  However, they were more than a couple years old, and simply no good at that point.
The first and most basic thing to do with any race car distribuor, is maximize the spark advance curve.  Ideally you do not want the advance to come in before 1,000 RPM (at idle), but you want to have it all in by 4000 RPM, or less.  This simply translates into horsepower that your engine has, but is not using.  The best way to know you advance curve is to put the distributor in a Sun or King distributor machinhe, and plot out the curve.  These machines are getting harder to come by, since they are no longer being produced.  The old ones that are still operating, are not as acurate as they once were.  Find an engine builder who can work with you on this, and you will not regret it.  The curve can be modifed by various spring kits that are available from after market companies.  However, we have found that the chart on the back of the package (if there is one) is not always true to what is seen on the machine, during a test run.  The curve below shows some results were were happy with, after testing a number of different spring kits for a circle track customer recently. 


Even a brand new distributor from one of the well known companies does not include a spring kit, which is sold seperately.  Keep in mind they are selling to everyone from drag racers, to steet rodderss, to road racers.  Each has different requirements.  Vacuum advance is good for a steet vehicle.  On a race distributor we also lockout the vacuum advance unit, so there is no chance of the spark advance floating around, during acceleration.  So many racers just but a new distributor, and assume everything is OK.   Below is a picture of our Sun distributor machine, which has been completely rebuilt by the Parmamont Distributor Machine Co.


We have 11 degrees of advance at the distributor, in the graph above.  Since the distributor runs at 1/2 the crank shaft speed, we will have 22 degrees of total advance with the distributor installed.  That means that we will need to set the rest of the advance with a timing light, at the crankshaft.  If we want 38 degrees of total advance, then the initial timing will be set at 16 degrees.  22 degrees plus 16 degrees equals a total of 38 degrees advance.
Knowing about spark advance is one of the basics, so make sure you fully understand what is going on with your cars distributor.  keep the plug wires fresh, and protected.  Replace them before trouble occurs.  Set  your cars timing with a gun at full advance, to make sure you are getting maximum horsepower.  Being off by a few degrees the wrong way can result in detonation, which can have disaterous results. 

Visit us on the web, for all your garage needs.  We are glad to help you out, however we can.

http://gearheadzproducts.com/distributorsplugwiresandaccessories.aspx


Monday, May 25, 2015

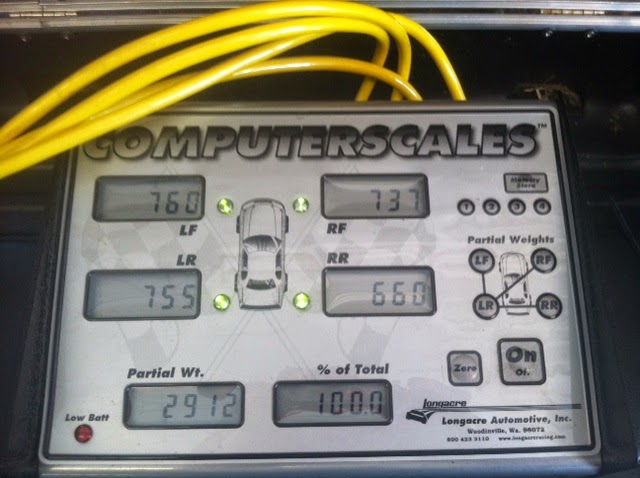
Scaling The Camaro SCCA GT-2 Road Race Car

When scaling any race car, there are a few simple but important steps to follow.  We use Longacre electronic scales, with each load cell marked for the the corner of the car it goes to. 


The first step is to level the scales.  We purchased an extendable bubble level from Menards, that works great for the job.  Each scale should be leveled, and then the four load cells checked against each other.  Without doing this, you will never get an accurate reading of your cars corner weights.  We have seen guys scales cars in the dirt at the track, on race day.  The shop floor is the best place to do this, and most floors are not all that level either. 

   
The car should be placed in gear so it will not roll.  In addition, we put some pieces of steel against the tires, to keep the race car firmly in place.  Tire pressures should be set as they are for race day.  Hoosier recomends 23 to 26 lbs. cold for our compound, so we have been using 24 pounds as our starting point.  After that, we add bags of salt to the drivers seat.  The salt bags are each weighed, to insure that we get the same weight as the driver will bring to the seat.  This makes it easier for your "hot shoe" to participate in the scaling process as well.  Before adding the salt, we set the corner heights to the rules, to get close to our starting point, the work to be done.
 
 
Our experience from the circle track days has been that adding a driver to the vehicle takes wedge (LR/RF) percentages from the static settings.  With the road race car, we prefer to have the LF/RF weights a close to equal as we can get.  If you are scaling a roundy roundy racer, make sure the sway bar is not preloaded, which will throw off your readings.  The bar should be fully backed off for scaling.  Due to our heavy driver, all the balast has been removed from our Howe Port City vehicle (former ASA racer).  You may need to add some, to bring the car up to minimum which in our case is 2830 lbs, for GT-2.
You will need to make corner corrections, to get the car where you want it.  With coil over shocks, this is really easy.  Make adjustments at all four corners.  For example if you need a little more LR/RF, then put a turn in the LR/RF, and take a turn out of the RR/LF.  We run Pro Shocks, with double adjustables on the front, and rebound adjustables on the rear.  Find someone to dyno your shocks, and make sure that there is no abnormalities in the curve, which can be seen in a computer print out from the dyno run.
Our car has gotten a little loose a couple time, in tight right hand turn situtations.  We went a little softer on the front springs, that what was in the car when we received it.  This is really the fun part of the whole thing, making small adjustments, and seeing how they affect the feel of the vehicle.


http://www.gearheadzproducts.com


Thursday, November 27, 2014

A Look Under The Hood Of Our GT2 SCCA Road Race Camaro

This car is a GT-2 legal SCCA race car, that can also be entered  as a TA-2 car, in the professional Trans Am series.  Our Howe/Port City car is an ex-ASA perimeter chassis, circle track race car.  It has  an actual series LS1 motor, that runs factory ignition coils, 10.5 compression ratio, dry sump oil pan, 180 headers, and a GM factory ECU. The sealed engines that were supplied for the ASA series went from Chevrolet, to Lingenfelter Performance Engineering (LPE), in Decatur, IN.  You will not find that they have much interest in them now days, but we have received good support from Schwanke Engines, in Springfield, MN.  They are doing a number of motors for the professional Trans Am Series (both LS-1, and LS-3), and offer packages that include everything from short blocks, up to complete, ready to race motors.  Visit them at:
 
 
Our own shop offers a lot of automotive related accessories, as well.  We are stocking more race related items every day, and have just finished redoing a nearby industrial building, for our mail order business.  We have a lot of used parts that are very useable, as well  If you are new to track days, or SCCA racing, we will be glad to answer any questions, and assist you however we can.  Our toll free number is:  866-229-7939.  You can visit us on the web at:


Sunday, September 14, 2014

Easy To Install Race Car Switch Panel

This is a good time of year to review everything in the cockpit,  add some upgrades such as an LED oil pressure light, radios, dash labels, etc.  A clean toggle switch arrangement is very important for the driver to have easy access to.  The photos below show our GT-2 house car dash board, as orginally supplied by the fabricators at Port City Racing, in Muskegon, MI.  All the operating switches are to the drivers left, easy to reach, and read as well.  You can purchase toggle switch extensions, which make it much easier  to access the switches, when buckeled snugly into the car.  The panel shown in the second photo is an easy to wire up and install unit, with most  of the hook  ups already made for you.  We had to relocate the fire bottle in the car when we brought it home, so it was in easy reach of the drivers left hand.  A very important detail, the last owner overlooked.  Don't forget to add high density padding, to all areas around the driver, and anywhere near by. 


Thursday, August 7, 2014

GT-2 Howe Port City Road Race Camaro


This blog is all about the work and set up involved with running a Howe type chassis, in road race compeition.  Our base car for discussion purposes can run in the GTA, and GT-2 classes of SCCA.  It would most likely make the grade for TA-2, in the Trans Am series as well.  It is a former ASA race car, with the LS-1 motor which came from Lingenfeher, down in Indiana.  The car was built at Port City Racing, using the Howe ASA spec center section.  It has a Jerrico four speed transmission, Winters quick change reat end, Wilwood brakes, Sweet power steering, Cool Shirt system, and Pro Shocks.  We worked with Schwanke up in Minnesota to get the ECU reflased.  Mike Cope down in Florida did the AR Camaro body conversion, which involved lowering the roll cage to get it to fit.  Mike has also helped us with the basic set up on the car, since this is our first tube frame road racer.  We will make reference to some of the products used on the car, that come from our own business, Gear Headz Products  

http://gearheadzproducts.com/